We are the midst of a unit about the 6-Day creation and I thought up these very basic crafts for our 18 month old to enjoy. She really had fun with these and they helped to bring the concepts of the creation into focus a little bit for her. Here are days 1 and 2:
Day One: “Let there be light.”
Materials: 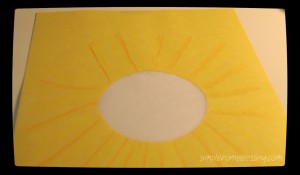
- construction paper (one piece each of blue and yellow)
- tissue paper (white or yellow)
- something in the shape of a circle (I used a lid)
- crayons (if desired)
- scissors and tape
- flashlight
How to:
Take a piece of white tissue paper and fold it in half. Then trace a 3 inch circle and cut out. Take two pieces of construction paper and fold them in half width-wise and trace half of a circle (you may want to make use a circle that is a little bit smaller than the first circle) on the fold in the center of the paper. Cut along the half circle. Open the paper back up and tape the two tissue paper circles over the hole you have in one of the sheets of construction paper. Place the other construction paper on top and tape the sides to “fuse” the two papers together. If desired, you could have your child color the yellow paper with beams of light.
Once the craft is constructed, take the flashlight and the craft into a dark place and do a demonstration of what happened when God said, “Let there be light.” We just quoted the Scripture using the NASB version. We showed G the dark side (blue) of the paper and then turned out the lights. We turned the yellow side of the paper toward her and when God said, “Let there be light,” my husband turned on the flashlight and shined it through the tissue paper.
Watch your child’s eyes light up when the light suddenly goes on from behind the tissue paper.
Day Two – “God separated the waters from the waters.”
Materials: 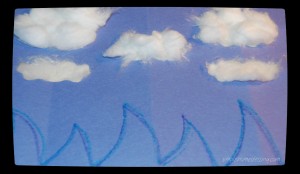
- construction paper (one sheet of blue)
- contact paper
- crayon
- cotton balls
- scissors
How-to:
Take the piece of construction paper and fold it in half width wise, then fold it in half again. Cut out freeform shapes of clouds along the folded edge of the paper only on the top portion of the paper. Unfold the paper one time (to where it is in half width wise) and cut a freeform shape of a cloud along the fold. Unfold the paper completely. Cut a piece of contact paper to size to fit the “clouds” you have on your paper. Separate one side of the contact paper from the backing and attach to the construction paper. Pull the backing away slowly as you press the rest of the contact paper to the construction paper. Turn over and draw waves with crayon on the bottom portion of the construction paper.
Grab your little one and give her some cotton balls to stick to the contact paper to make clouds and talk to her about clouds while she constructs the rest of the project. She can either use the whole cotton ball to stick to the contact paper or stick the cotton ball on and then remove it (this give the clouds a wispy look). Then give her some crayons and let her color the water and the waves while you talk about the water and the waves.
Please feel free to use these ideas with your little ones and let me know how it went.
I am linking up to In Lieu of Preschool’s Tuesday Tots link for the first time. If you stopped by through there, please say hello and I will venture your way and say hi too!
This post was shared on: Titus 2 Tuesdays


This Post Has 3 Comments
Welcome to a new Linky Party for Kid-Focused Bloggers. Monday Kid Corner is a place to share your kid-friendly activities and crafts. Please join us at http://www.mondaykidcorner.blogspot.com. See you there!
Thanks for the invite!
Thanks for sharing on Monday Kid Corner (www.mondaykidcorner.blogspot.com). Looking forward to what you post next on the Linky!